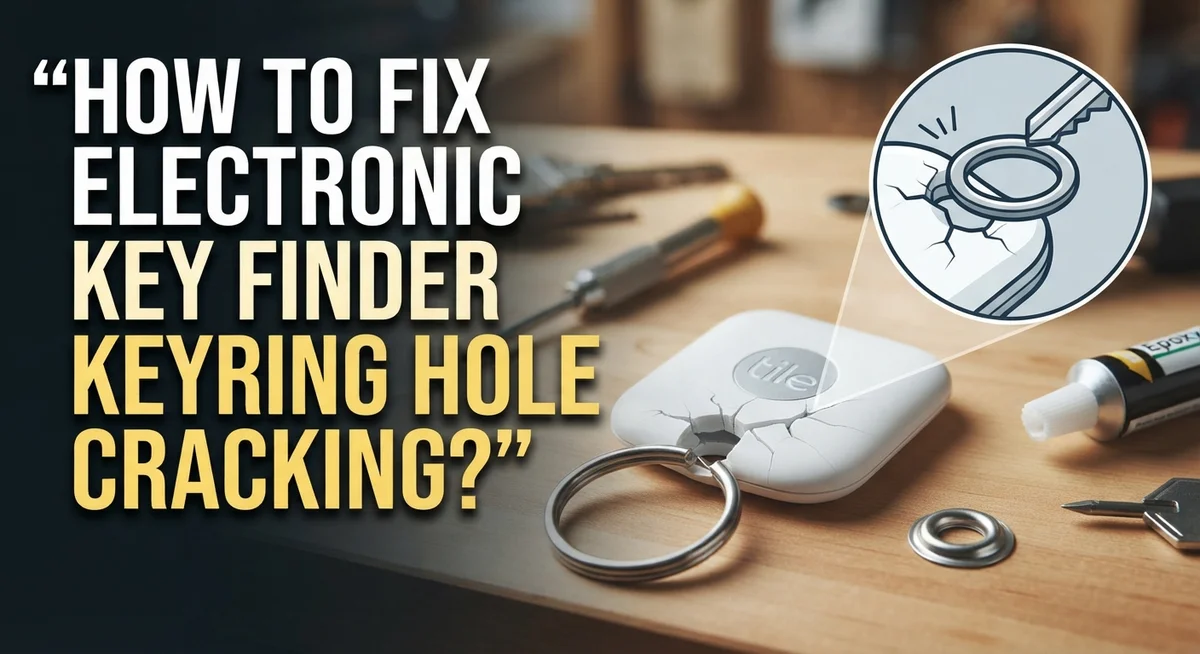
How To Fix Electronic Key Finder Keyring Hole Cracking?
Your electronic key finder helps you find your keys fast. But what happens when the keyring hole starts cracking?
This small plastic loop holds a lot of weight. It goes through daily stress every time you attach or remove your keys.
Over time, this constant pulling causes tiny cracks. If you ignore them, your key finder can snap and fall right off your keyring.
The good news? You don’t need to buy a new device. You can fix this problem yourself with a few simple tools.
In a Nutshell
- Drill a small new hole below the crack. Use a tiny 1/16 inch bit to keep the plastic strong. This gives your keyring a fresh spot to hold on.
- Thread a metal wire through the new hole. Bend it into a small loop. This loop acts as a tough new anchor point for your keys.
- Seal it with epoxy. Apply adhesive to both sides of the hole. This locks the wire in place and stops water or dirt from getting in.
- Try a split ring instead. Gently spread it open with pliers. Slide it onto your key finder without any drilling at all.
- Avoid the chip area. Never drill near buttons or electronic parts. This keeps your device safe from permanent damage.
- Reinforce it early. Don’t wait for the plastic to crack completely. A little care now saves you a bigger headache later.
Why Keyring Holes Crack Over Time
Your keyring hole experiences constant stress every single day. When you attach and detach your electronic key finder, the plastic stretches. This happens hundreds of times over weeks and months.
The material itself gets tired. Plastic loses flexibility as it ages. Heat from your pocket or bag speeds up this process. UV light from sunlight also weakens the plastic fibers.
Repeated pulling creates tiny stress points. These spots appear around the hole edges first. You might not notice them at first. But they grow larger with each use.
Weight distribution matters too. Heavy key bundles pull down on one side of the hole. This uneven pressure causes cracks to form faster than normal wear would.
Temperature changes affect the plastic. When it gets hot, plastic expands. When it cools down, it contracts. This constant expanding and shrinking weakens the material over time.
Material fatigue is the real culprit here. The plastic can only bend so many times before it breaks. Think of bending a paperclip back and forth. Eventually, it snaps.
Older electronic key finders suffer more damage. The plastic becomes more brittle as years pass. Newer devices have better plastic formulas, but they still crack eventually.
The attachment point bears all the load. This single spot holds your entire keyring. No other part of the device shares this responsibility. That’s why cracks always start near the hole.
Understanding why cracks happen helps you prevent future damage. You now know the stress comes from repeated use, material fatigue, and uneven weight distribution. This knowledge prepares you for the repair steps ahead. Knowing the cause helps you choose the best fix for your situation.
Tools and Materials You’ll Need for the Repair
Before you start fixing that cracked keyring hole, gather the right supplies. Having everything ready makes the job faster and easier.
You’ll need a drill with a small bit. A 1/16 inch bit works best for creating a new hole below the damaged area. This small size prevents further weakening of the plastic structure.
Metal wire is essential for reinforcement. Use thin gauge wire that threads easily through your new hole. This wire creates a loop that distributes stress away from the crack point.
Epoxy adhesive or strong plastic glue seals everything together. Two part epoxy works better than single component options because it bonds plastic firmly. Make sure your adhesive works on both plastic and metal surfaces.
You’ll also want pliers for spreading rings. Regular slip joint pliers or needle nose pliers both work fine. These help you gently open split rings without damaging them further.
Split rings themselves serve as an alternative solution. These small metal rings come in various sizes and attach to your key finder without stressing the original hole.
Have sandpaper or a small file nearby. Light sanding around the cracked area helps epoxy stick better to the surface.
A clean cloth removes dust and debris before you apply adhesive. Cleanliness matters because epoxy won’t bond well to dirty surfaces.
Protective gloves keep epoxy off your skin. This sticky substance is difficult to remove once it dries.
Finally, gather a small container for mixing epoxy. Use something you don’t mind throwing away afterward.
These basic items cost very little and likely sit in most home toolboxes already. You probably own most of these supplies right now.
Step-by-Step Guide to Fixing a Cracked Keyring Hole
Start by examining the cracked hole carefully. Look at where the crack begins and how far it extends. This inspection helps you decide which repair method works best for your situation.
Clean the area thoroughly before you begin any work. Use a soft cloth to remove dirt, dust, and debris around the damaged hole. A clean surface helps adhesive bond properly and lets you see the damage clearly.
For the drilling method, mark a spot slightly below the existing crack. Use a very small drill bit, no larger than 1/16 inch. Drill slowly and carefully to avoid hitting any electronic components inside the device. Stop immediately if you feel resistance.
Thread a thin metal wire through your new hole. Create a small loop on one side. This wire acts as reinforcement and distributes stress away from the cracked area. The loop gives your keyring an alternative attachment point.
Apply epoxy or strong adhesive to both sides of the hole. Press the wire loop firmly into place. Let the adhesive cure completely according to package directions, usually 24 hours. This creates a solid bond that prevents further cracking.
The split ring method offers a simpler alternative. Use pliers to gently spread your existing keyring open. Attach a split ring to the chain instead of the main device. This removes direct stress from the original hole entirely.
Whichever method you choose, work slowly and carefully. Rushing leads to mistakes that make damage worse. Once complete, test the repair gently before adding your keys back. Your electronic key finder should work reliably again with proper care and attention to the repair steps.
Using Split Rings as a Simple Fix
Split rings offer a practical solution when your electronic key finder’s attachment hole starts showing damage. This method works because it distributes stress differently than a direct hole attachment.
A split ring is essentially a small metal loop that opens and closes. You spread it apart using pliers, then slip it through your existing keyring hole. This design prevents the concentrated pressure that causes cracks in the first place.
Here’s why this approach works well. The split ring’s design spreads the load across a larger area. Your keyring hole doesn’t experience the same intense pulling force. The metal construction also adds durability that plastic holes simply cannot match.
To use a split ring, start by examining your current keyring hole. Even if it’s already cracked, a split ring can still help. Gently spread the split ring open with pliers. Avoid forcing it too hard, as this can damage the ring itself.
Thread the opened split ring through your existing hole. Then carefully close it back by releasing the pliers. The ring should sit snugly without being overly tight. You’ve now created a reinforced attachment point.
The beauty of this method is its simplicity. You don’t need epoxy, drills, or special skills. It takes just a few minutes to complete. Split rings cost very little and last for years.
This solution works especially well if your keyring hole shows early stress signs. Applying a split ring before major cracking occurs prevents future damage. If the hole is already severely damaged, combine this method with epoxy for maximum strength. Split rings essentially give your electronic key finder a second life at the attachment point.
Tips for a Stronger, Longer-Lasting Repair
Reinforcement before damage occurs is your best defense. Start by identifying stress points on your electronic key finder. The attachment hole experiences constant tension every time you clip and unclip your keys.
Apply preventative epoxy around the hole’s edges before any cracks appear. This creates a protective barrier that absorbs stress. Work on a clean, dry surface for best results. Let the adhesive cure fully according to package instructions before using your key finder.
Consider using a split ring as your primary attachment method. Split rings distribute weight more evenly than direct hole stress. They reduce the force concentrated on one small area. This simple change can extend your device’s lifespan significantly.
Avoid over tightening when attaching keyrings. Gentle pressure is enough to keep everything secure. Excessive force accelerates material fatigue and cracking. Check your attachment regularly for signs of weakness.
Rotate your key finder’s position occasionally. This spreads wear across different areas instead of concentrating damage in one spot. If you notice the hole becoming loose, address it immediately rather than waiting for visible cracks.
Use protective cases when possible. Cases absorb impact and reduce stress on attachment points. They also protect electronic components from damage that could make repairs more complicated.
Inspect your key finder monthly for early warning signs. Look for small stress marks or slight discoloration around the hole. Catching problems early means simpler fixes and longer device life.
These preventative steps cost minimal time and effort. They save you from dealing with major repairs later. Proper maintenance keeps your electronic key finder functional for years.
Common Mistakes to Avoid During Repair
When you repair a cracked keyring hole, several mistakes can make the problem worse instead of better. Understanding what to avoid saves you time and frustration.
Drilling holes that are too large is the most common error. A hole bigger than 1/16 inch weakens the structure further and creates new stress points. The device becomes fragile around the enlarged opening. Stick to the smallest bit size that works for your wire.
Drilling near electronic components causes serious damage. Your key finder has chips, buttons, and circuits inside. A drill bit can destroy these parts permanently. Always drill below the attachment point, away from any internal electronics. Mark your spot carefully before you start.
Over tightening your keyring attachment is another frequent mistake. Many people pull the keyring hard to secure it tightly. This creates immediate stress on the hole and speeds up cracking. Attach your keyring firmly but gently. You want it secure, not forced.
Ignoring early stress signs means small problems become big ones. If you notice the hole looking slightly damaged or the ring feeling loose, act immediately. Early intervention prevents complete failure.
Applying adhesive incorrectly also causes repairs to fail. Some people use too little epoxy or skip one side of the hole. Both sides need coverage for strength. Mix your adhesive properly and apply it generously to damaged areas.
Finally, using the wrong adhesive weakens your repair. Standard glues won’t hold under the stress that keyrings experience. Choose a strong epoxy formulated for plastic and metal bonding.
These mistakes are easy to avoid with careful attention and patience during your repair work.
Troubleshooting: When the Repair Doesn’t Hold
Your repair may not hold for several reasons. Understanding why helps you fix the problem properly the second time around.
Epoxy application is often the culprit. Most people apply adhesive to only one side of the hole. The crack needs coverage on both surfaces to bond correctly. Apply epoxy generously to both the inside and outside of your key finder. Let it cure for the full recommended time before attaching anything.
Drilling too close to the original crack weakens the structure further. The new hole creates additional stress points. Your key finder’s material cannot support multiple damaged areas. Drill at least half an inch away from any existing cracks when possible.
Material fatigue continues after repair. If you attach and detach your keyring constantly, the same stress returns. The hole will crack again in the same spot. Consider using a split ring as a permanent solution instead. This spreads the attachment load across a larger area.
Incorrect wire threading causes repairs to fail quickly. Your metal wire loop must be tight and secure. Loose wire means the hole bears all the stress again. Thread the wire through multiple times if needed. Create a firm loop that doesn’t shift when you pull on it.
Some people ignore early warning signs before attempting repair. Small stress marks become major cracks fast. If your repair doesn’t hold, inspect the entire attachment area for hidden damage. You may need to reinforce multiple spots, not just the main hole.
Start fresh if your first attempt failed. Remove all old adhesive completely. Clean the area thoroughly. Begin the repair process again with extra attention to application and curing time. Patience during this second attempt prevents future frustration.
Preventing Future Keyring Hole Damage
Preventing future keyring hole damage starts with understanding what causes the problem in the first place. Your electronic key finder experiences stress every time you attach or detach it from your keyring. This repeated motion creates wear that eventually leads to cracks.
The best prevention strategy is to reduce the frequency of attachment and detachment. Keep your key finder on the same keyring for extended periods instead of moving it between different rings daily. This simple habit cuts stress on the hole dramatically.
Using a split ring as your primary attachment method is highly effective. Split rings distribute pressure more evenly than direct hole attachment. They also allow you to add or remove keys without touching the key finder itself.
Inspect your device monthly for early warning signs. Look for small cracks, discoloration around the hole, or loose plastic. Catching these issues early means you can reinforce the area before serious damage occurs.
Apply protective reinforcement around the hole’s edges before any cracks appear. This preventative step takes minimal time but provides significant protection against future damage.
Avoid over tightening when you attach keyrings. A snug connection is all you need. Excessive force accelerates material fatigue and creates unnecessary stress on the plastic.
Store your key finder carefully when not in use. Keep it away from extreme heat or cold, which can weaken plastic over time. Protect it from moisture and direct sunlight as well.
Rotate your key finder’s position occasionally on your keyring. If you always attach it to the same spot, that single point bears all the stress. Moving it around distributes wear more evenly across the device.
These preventative measures cost almost nothing but protect your investment effectively.
Final Thoughts
Fixing a cracked keyring hole does not need to be complicated. With patience and the right steps, you can restore your electronic key finder to full working order.
The small drill and wire method works well for most cracks. It gives your key finder a stronger attachment point that resists future stress.
Remember that your electronic components matter most. Always check where the chip sits before you touch a drill to your device. A damaged chip means a useless key finder, even with a perfect keyring hole.
Patience makes all the difference during this repair. Rushing through steps often leads to weak bonds or misaligned holes.
Take your time with each stage of the process. Let adhesive cure fully before you test the repair. Check your wire loop twice before you seal it in place.
Simple tools work best for this job. You do not need special equipment to fix a cracked keyring hole. A small drill bit, some wire, and quality adhesive get the job done.
Think about long term use too. Your repair should hold up under normal daily handling. If you notice new stress marks forming, address them right away instead of waiting.
Split rings often provide the easiest solution for people who want to avoid drilling altogether. This method skips repair work completely and protects your key finder from future cracks.
Your key finder deserves care and attention. A cracked keyring hole does not mean the end for your device. With the right approach, you can extend its life and keep tracking your keys with confidence.
Take these steps one at a time. Your repair will hold, and your key finder will serve you well for a long time to come.
Frequently Asked Questions
Why does my electronic key finder’s keyring hole crack in the first place?
Keyring holes crack because of stress and material fatigue. Each time you attach and detach your key finder, the plastic or metal experiences repeated pressure. Over time, this weakens the material around the hole. The constant motion creates tiny stress points that eventually become visible cracks.
Can I prevent keyring hole damage before it happens?
Yes, prevention works better than repair. Reduce how often you attach and detach your key finder from keyrings. Use split rings instead of threading directly through the hole. This spreads the stress across a wider area. Check your device monthly for early warning signs like small stress marks or discoloration around the hole.
What’s the safest way to drill a new hole if the original one is damaged?
Drill a small hole using a 1/16 inch bit maximum. Position it below the existing crack to avoid the damaged area. Never drill near electronic components, buttons, or chips. A smaller hole is always better than a larger one. Larger holes weaken the structure even more.
Why didn’t my epoxy repair hold after a few weeks?
Most repairs fail because adhesive gets applied to only one side of the hole. Fill both sides completely for the best bond. Also, if you immediately start attaching and detaching your key finder, the same stress returns. Wait for the epoxy to cure fully before using it again. Some people need to remove old adhesive completely and start fresh.
Is a split ring better than drilling a new hole?
Split rings are often the easiest solution. Spread an existing ring gently with pliers, then attach a split ring to your key finder’s chain. This method avoids drilling altogether and distributes weight more evenly. It works well for people who frequently move their key finder between different keyrings.

Hello, i’m Ivoria i am the face behind Tech Tracker Blog. I am passionate about my work and love to explore gadgets and share about my experience.