How To Fix Portable Bluetooth Speaker Passive Radiator Tearing?
Does your portable speaker sound weak or distorted? A torn passive radiator might be the culprit.
Passive radiators help boost bass without using extra power. They vibrate along with your speaker’s sound waves. This creates that deep, rich bass you love.
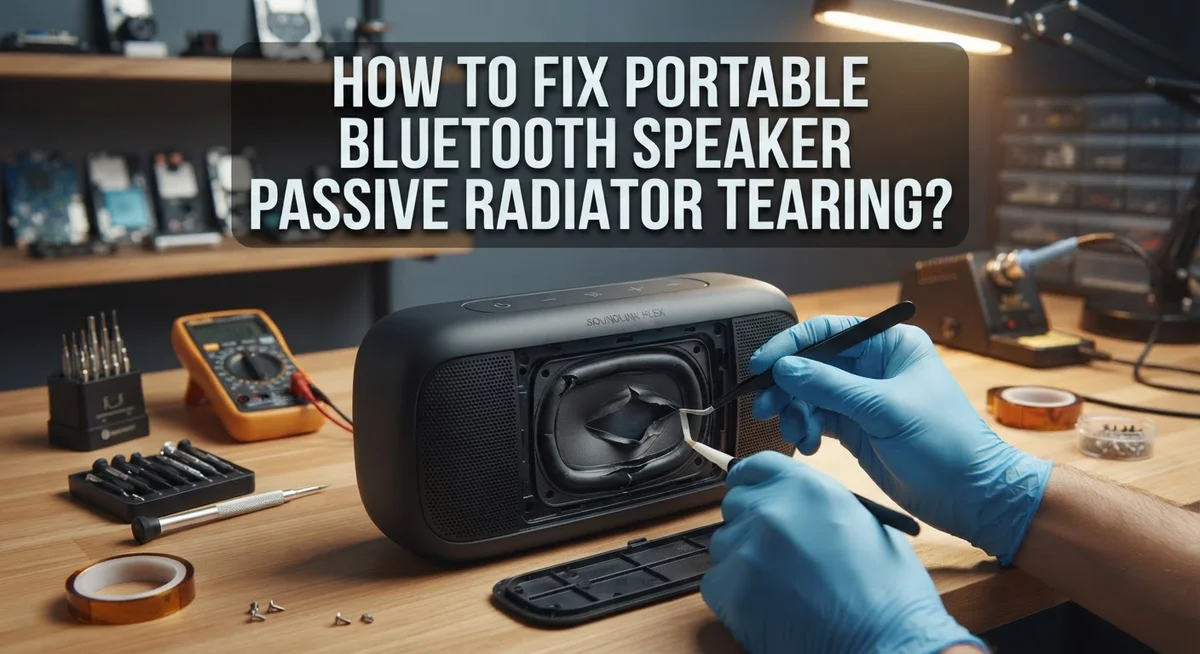
But over time, the rubber surround on these radiators can wear out. It stretches, cracks, and eventually tears. This damage causes blown out sound and weak bass response.
The good news? You can often fix this problem yourself. You do not need to buy a new speaker right away.
This guide walks you through the entire repair process. You will learn how to clean the damaged area properly. We will show you which adhesives work best for lasting repairs.
You will also discover common mistakes people make during this fix. Many folks rush the drying time or use cheap glue. Both errors lead to quick failure and wasted effort.
By the end of this article, you will know exactly how to diagnose the issue. You will also have the confidence to repair your speaker’s passive radiator correctly. Let’s get your bass sounding great again.
In a Nutshell
Here’s a quick recap of the entire fix. Use this as your go to checklist.
-
Clean thoroughly first. Wipe away all old rubber bits with rubbing alcohol before you do anything else. This step makes the new adhesive stick properly.
-
Let it dry completely. Patience matters here. Rushing this stage can ruin your repair before it even starts.
-
Choose quality adhesive. Cheap glue turns brittle and fails fast. Spend a little more for adhesive that actually lasts.
-
Check enclosure size and polarity. If bass still sounds off after your repair, these factors might be the real issue.
-
Look for internal damage. Open up the speaker fully during teardown. Sometimes the tear is not the only problem inside.
-
Test before you seal everything up. Confirm the sound is fixed before you close the speaker for good.
-
Remember dead speakers need different fixes. If your speaker won’t turn on at all, check the battery or charging port first. That’s a separate issue from radiator tears.
What Is a Passive Radiator and Why It Tears
A passive radiator is a cone shaped component inside your portable speaker that vibrates to produce bass sounds. Unlike active drivers that need electrical power, passive radiators work through air pressure alone. When your speaker plays low frequency sounds, the active driver pushes air that makes the passive radiator move back and forth.
This motion creates deeper, richer bass without draining your battery or requiring extra circuitry. The radiator sits in the speaker enclosure and responds naturally to sound waves generated by the main driver.
Why does the passive radiator tear? The rubber surround that holds the radiator in place degrades over time. Heat, moisture, and constant vibration all contribute to this breakdown. Repeated flexing causes tiny cracks that grow into larger tears.
Age is a major factor too. Rubber compounds lose flexibility after months or years of use. Sun exposure and temperature changes speed up this deterioration process.
What happens when it tears? A torn passive radiator creates blown out or distorted sound. Your bass response becomes weak or disappears entirely. You might hear crackling, popping, or muffled audio instead of clean music.
The speaker still works, but the sound quality drops significantly. Some users describe it as listening through a broken filter.
The good news? This problem is fixable. The tear doesn’t mean your speaker is permanently damaged. With the right approach and materials, you can restore the radiator to working condition. Most people can complete this repair at home without special tools or experience. Understanding what the passive radiator does helps you recognize when something goes wrong and take action quickly.
Signs Your Passive Radiator Is Torn vs Other Sound Issues
A torn passive radiator sounds very different from other speaker problems. You need to know the difference so you can fix the right issue.
Blown out or distorted sound is the main sign of a torn radiator. The bass sounds mushy and unclear. Notes that should be crisp become fuzzy. If you turn up the volume, the distortion gets worse, not better. This happens because the torn rubber lets the radiator move incorrectly.
Weak bass response can mean a torn radiator, but it might not. Check other causes first. Incorrect polarity in your wiring kills bass instantly. Over stuffing the speaker enclosure also reduces bass output. An enclosure that is too small or too large causes weak bass too. A torn radiator creates distorted bass, not just quiet bass.
Crackling or popping sounds suggest a different problem. These noises often come from loose internal components or connection issues. A torn radiator rarely creates crackling.
No sound at all means your radiator is not the problem. Check if your speaker turns on. Test the battery and charging port. Look for broken wires or loose connections inside.
Rattling sounds point to loose parts, not a torn radiator. Shake your speaker gently and listen. If something moves inside, you have a loose component.
Muffled sound can happen with a torn radiator, but also with dust blocking the speaker cone. Clean the speaker first before assuming the radiator is torn.
Pay attention to when the distortion happens. Does it only occur at high volumes? Does it affect all frequencies or just bass? These clues help you identify the real issue. This information guides your repair decision.
Tools and Materials You’ll Need Before Starting
Before you start fixing your passive radiator tear, gather the right tools and materials. Having everything ready prevents frustration and keeps your repair smooth.
Cleaning supplies matter first. You need rubbing alcohol to remove old adhesive and rubber debris. Get lint free cloths or paper towels to wipe surfaces without leaving fibers behind. These fibers can interfere with your repair and create new problems.
Adhesive is your most important material. Select a flexible rubber adhesive or contact cement made for speaker repairs. Avoid super glue or regular craft glue because they become brittle and fail quickly. Quality adhesive stays flexible as your radiator vibrates during use.
Basic tools keep things simple. A small screwdriver set helps you open your speaker enclosure safely. Tweezers help you position small pieces of torn rubber during repair. A small brush or applicator lets you spread adhesive evenly without mess.
Safety equipment protects you. Wear gloves when handling adhesive and rubbing alcohol. Work in a well ventilated space because solvents produce fumes. Keep paper towels nearby for quick cleanups.
Replacement materials might be needed. If the tear is severe, you may need a replacement rubber surround or radiator cone. Measure your radiator diameter and thickness before ordering. Write down these measurements so you get the right size.
Optional but helpful items include a heat gun for softening old adhesive and a clamp or weight to hold pieces together while drying. A small container helps you organize screws and small parts during disassembly.
Gathering supplies takes just minutes but saves hours of frustration later.
Step-by-Step: Disassembling the Speaker Safely
Opening your portable speaker requires care and attention. You want to avoid damaging internal components while accessing the passive radiator. Start by unplugging your speaker and letting it sit for a few minutes. This ensures any remaining power dissipates safely.
Locate the screws on your speaker’s exterior. Most portable speakers have screws on the bottom, back, or sides. Use your small screwdriver to remove each screw slowly. Keep screws in a small container so you don’t lose them during the repair process.
Gently pry open the speaker casing. Work around the edges with your screwdriver, applying light pressure. Avoid forcing the case apart, as internal wires may be attached inside. Listen for any clicking sounds that indicate resistance.
Once the casing separates, identify the passive radiator. It’s usually a rubber cone or disc mounted on one side of the speaker. Look for visible tears, cracks, or areas where the rubber has separated from its frame. Take a photo with your phone so you remember the exact position of all components.
Check for any internal damage while the speaker is open. Dust buildup, loose connections, or corrosion can affect performance. Clean away dust gently using a soft brush or compressed air. Avoid touching circuit boards directly with your hands.
Examine how the radiator connects to the speaker body. Note whether it’s glued, screwed, or both. Understanding the attachment method helps you plan your repair strategy. Some radiators can be removed entirely, while others stay in place during repair.
Keep the casing and all small parts organized on a clean surface. You’ll need to reassemble everything correctly once the repair finishes.
Step-by-Step: Cleaning and Prepping the Torn Surround
Now that your speaker is open, the torn surround needs careful attention. Start by examining the damaged area closely. You’ll see old rubber material clinging to the radiator frame and the speaker body. This debris must go completely.
Use rubbing alcohol and a soft cloth to clean away all old rubber residue. Work slowly around the edges where the surround once attached. The alcohol dissolves old adhesive and removes dust that prevents new repairs from sticking. Don’t rush this step. Incomplete cleaning causes new adhesive to fail within weeks.
Pay special attention to the radiator cone itself. Gently wipe away any dust or particles on the surface. A clean cone vibrates better and helps your bass response return to normal. Use a dry cloth afterward to remove alcohol moisture.
Let everything dry completely before moving forward. This patience matters more than you think. Wet surfaces reject adhesive, and your repair will peel apart during use. Give the area at least 30 minutes to air dry fully.
While waiting, inspect the radiator for additional damage. Look for cracks in the cone or bent frame pieces. Small tears might need patching, while severe damage requires replacement. Check that the radiator moves freely when you gently press it. It should spring back smoothly without resistance.
Examine the mounting points where the surround attached. These areas often show wear or damage. Clean them extra thoroughly since they’re critical contact zones. Your repair’s success depends on these surfaces being absolutely clean and dry.
Once everything is prepared and dry, you’re ready for adhesive application. The foundation is set for a strong, lasting repair that restores your speaker’s bass performance.
Step-by-Step: Applying Adhesive and Reassembling
Start by applying your adhesive carefully to the torn area. Work in small sections rather than covering the entire surround at once. This gives you better control and prevents the glue from drying too quickly.
If you’re reattaching a cleanly torn piece, apply adhesive to both the radiator cone and the mounting surface. Press the torn edges together firmly and hold them for the time your adhesive requires. Most flexible adhesives need 30 to 60 seconds of pressure to set properly.
For patches over smaller tears, cut a piece of flexible rubber material slightly larger than the damaged area. Apply adhesive around the tear edges, then press your patch firmly into place. Smooth out any air bubbles by working from the center outward.
Allow adequate drying time before reassembling your speaker. Rush this step and your repair fails quickly. Check your adhesive instructions for exact drying times. Some products need 24 hours for full strength, while others set faster.
Once the adhesive is completely dry, inspect your work. The radiator should move freely without sticking to the enclosure. Gently flex the surrounding area to confirm the repair holds.
Now reassemble your speaker carefully. Line up the casing properly before inserting screws. Tighten screws evenly to avoid putting stress on one side of the repair.
Test your speaker before considering the job complete. Play music at moderate volume first. Listen for any rattling or distortion. If the repair holds and bass sounds normal, you’ve successfully restored your passive radiator. If problems remain, the tear may be more severe than initially visible, or additional internal damage exists.
Common Mistakes That Ruin a Passive Radiator Repair
Many people damage their passive radiator repair by making preventable mistakes during the process. Understanding these errors helps you succeed on your first attempt.
Using cheap adhesive is the biggest mistake. Budget glues become brittle within weeks. They crack and fail when the radiator vibrates during bass playback. Your repair falls apart faster than the original tear. Invest in flexible, durable adhesive designed for rubber materials. It stays pliable and bonds permanently.
Insufficient cleaning ruins repairs before they even start. Old rubber residue prevents new adhesive from bonding properly. You must remove every trace of the original surround material. Rubbing alcohol works well for this task. Scrub the entire mounting surface thoroughly. Skip this step and your patch peels off within days.
Rushing the drying process causes immediate failure. Many people reassemble their speakers too quickly. Adhesive needs proper time to cure completely. Check the manufacturer’s instructions for exact drying times. Typically, you should wait several hours or overnight. Premature reassembly means your repair won’t hold under vibration stress.
Ignoring internal damage is another critical error. While your speaker is open, inspect everything carefully. Look for cracks in the enclosure, loose components, or water damage. Address these issues now before sealing the speaker back up. Missing internal problems means your repair won’t solve the actual sound quality issues.
Some people apply adhesive unevenly or too sparingly. Coverage matters significantly. Apply consistent adhesive around the entire torn area. Don’t skimp on the amount. A thin layer won’t create a strong bond.
Finally, avoid testing your speaker immediately after reassembly. Wait until the adhesive fully cures. Play music at moderate volume first to check for issues before pushing the speaker to maximum power.
Troubleshooting After the Repair: Bass, Polarity, and Sound Checks
After your repair dries completely, you need to check three critical areas: bass response, speaker polarity, and overall sound quality. These checks tell you if your passive radiator repair actually worked.
Start by playing familiar music at low to medium volume. Listen carefully for blown out or distorted bass sounds. If the bass still sounds weak or hollow, your radiator tear may not be fully sealed. Check that your patch or reattached surround sits flush against the mounting surface with no gaps or wrinkles.
Next, verify speaker polarity. If your speaker has multiple drivers inside, incorrect wiring causes phase cancellation. This makes bass disappear even though the radiator works fine. Listen for a thin, tinny sound that lacks depth. If you hear this, check your internal wiring connections. Make sure positive and negative wires connect to the correct terminals.
Pay attention to how the radiator cone moves. It should vibrate smoothly and symmetrically. If it moves unevenly or sticks, adhesive may have seeped into the cone mechanism. Gently wiggle the radiator by hand to feel for resistance or grinding sensations.
Test at different volume levels. Low volume reveals polarity problems. High volume shows whether your adhesive repair holds under stress. If distortion appears only at high volumes, your patch may be separating.
Check the speaker enclosure itself. If bass still sounds off, the enclosure might be over stuffed with foam or have internal damage you missed during teardown. Sometimes a dented speaker wall reduces bass response even with a perfect radiator repair.
Document any remaining issues. This information helps you decide whether additional repairs are needed or if professional service makes more sense.
Final Thoughts
Fixing a torn passive radiator takes patience, not fancy tools. Most repairs succeed when you clean the surface well and use strong adhesive. Rushing this process almost always leads to failure.
Your speaker’s bass depends on this small rubber part working correctly. A proper repair brings back the deep sound you remember. It also saves you money compared to buying a new speaker.
Quality matters more than speed in every step of this process. Cheap glue feels like a shortcut, but it breaks down fast. Spend a bit more on adhesive built to last.
Give your repair enough time to cure fully. Even if it looks dry, wait the full recommended period. Testing too early can undo all your hard work.
Remember that bass problems are not always about tears. Sometimes polarity or enclosure issues cause weak sound. Always check these areas before assuming the radiator failed.
If your first repair does not sound right, do not panic. You can often redo the adhesive step and try again. Most passive radiators are forgiving if you clean off old glue first.
Speaker repair is a skill that improves with practice. Your second or third fix will likely go faster and smoother. Keep notes on what worked well for future reference.
This kind of repair builds confidence in handling electronics. You save gear that might otherwise end up in the trash. That is good for your wallet and good for the environment.
With careful cleaning, the right adhesive, and enough drying time, your speaker can sound great again. Take your time, follow each step, and trust the process. Your portable speaker deserves a second chance at strong, clear bass.
Frequently Asked Questions
Why does my speaker sound blown out or distorted?
A torn passive radiator is usually the culprit. When the rubber tears, it cannot vibrate properly. This causes the speaker to produce a fuzzy or crackly sound instead of clean bass. The radiator works like a pump to push air and create deeper tones.
Without it working correctly, your speaker struggles to handle any volume level. Even quiet music can sound distorted. You might notice the problem gets worse at higher volumes.
Can I repair a passive radiator myself?
Yes, you can. The repair is straightforward and does not require special tools. You need rubbing alcohol, a clean cloth, and quality adhesive.
Start by opening your speaker carefully. Clean away all old rubber bits with alcohol. Let everything dry completely. Then apply adhesive to reattach the torn rubber or patch the tear.
The key is patience. Rushing this process causes failures. Give your adhesive enough time to cure before you reassemble anything.
What makes a passive radiator repair fail?
Using cheap glue is the biggest reason repairs fail. Budget adhesives become brittle within weeks and crack again.
Insufficient cleaning also ruins repairs. Old rubber residue prevents new adhesive from bonding properly. Rushing the drying time causes immediate failure too.
Some people apply adhesive unevenly or use too little. Others reassemble their speakers before the glue fully cures.
How do I know if my passive radiator is actually torn?
Look inside your speaker after removing the cover. A healthy radiator has smooth rubber with no visible cracks or splits.
If you see tears, holes, or the rubber peeling away, that is your problem. Sometimes the damage is obvious. Other times you need good lighting to spot smaller tears.
Test by gently pressing the radiator cone. It should move freely without resistance.

Hello, i’m Ivoria i am the face behind Tech Tracker Blog. I am passionate about my work and love to explore gadgets and share about my experience.